Tighten Up: Expert Solutions When The Handle On Your Tap Is Loose
Is your tap handle wobbly, spinning freely, or threatening to come off entirely? A loose tap handle is more than just an annoyance; it can lead to wasted water, dripping faucets, and eventually, more significant plumbing problems. This comprehensive guide provides you with the knowledge and step-by-step instructions to diagnose the cause of the loose handle, fix it effectively, and prevent it from happening again. We’ll cover everything from identifying the type of tap you have to exploring advanced repair techniques, ensuring you can confidently tackle this common household issue. Consider this your ultimate resource, drawing upon expert insights and practical experience to restore your tap to perfect working order.
Understanding Why Your Tap Handle Is Loose
A loose tap handle is rarely a mystery. It’s usually the result of wear and tear, loose screws, or corrosion. However, understanding the specific cause is crucial for a lasting repair. Let’s delve deeper into the common culprits:
- Loose Screws: This is the most frequent offender. The screw that secures the handle to the valve stem can loosen over time due to vibrations and repeated use.
- Worn-Out Adaptors: Some tap handles use plastic or metal adaptors to connect to the valve stem. These adaptors can crack or wear down, leading to a loose connection.
- Corrosion: Mineral buildup and corrosion can affect the screw, valve stem, or handle itself, preventing a tight fit.
- Damaged Valve Stem: In more severe cases, the valve stem itself might be damaged, preventing the handle from securing properly.
The type of tap also plays a role. Single-lever taps, mixer taps, and traditional two-handle taps each have unique mechanisms and potential failure points. Recognizing your tap type is the first step toward a successful repair. According to plumbing experts, identifying the specific failure point is half the battle.
Essential Tools and Materials for Tap Handle Repair
Before you begin, gather the necessary tools and materials. Having everything on hand will make the repair process smoother and more efficient:
- Screwdrivers: A set of screwdrivers, including Phillips head and flathead, in various sizes.
- Allen Wrench Set: Many modern taps use Allen screws to secure the handle.
- Adjustable Wrench: For tightening nuts and fittings.
- Penetrating Oil: To loosen corroded screws or parts.
- White Vinegar: For dissolving mineral buildup.
- New Screws/Adaptors: Having replacement parts on hand is always a good idea.
- Clean Cloths: For wiping up spills and cleaning parts.
Safety is paramount. Turn off the water supply to the tap before starting any repairs. Place a towel or bucket underneath to catch any residual water.
Step-by-Step Guide to Tightening a Loose Tap Handle
Here’s a detailed guide to tightening a loose tap handle, covering the most common scenarios:
Scenario 1: Loose Screw
- Locate the Screw: Look for a screw on the front, side, or top of the handle. Some handles have a decorative cap that needs to be removed first.
- Tighten the Screw: Use the appropriate screwdriver to tighten the screw. Be careful not to overtighten, as this could strip the screw or damage the handle.
- Test the Handle: Check if the handle is now secure. If it’s still loose, proceed to the next step.
Scenario 2: Worn-Out Adaptor
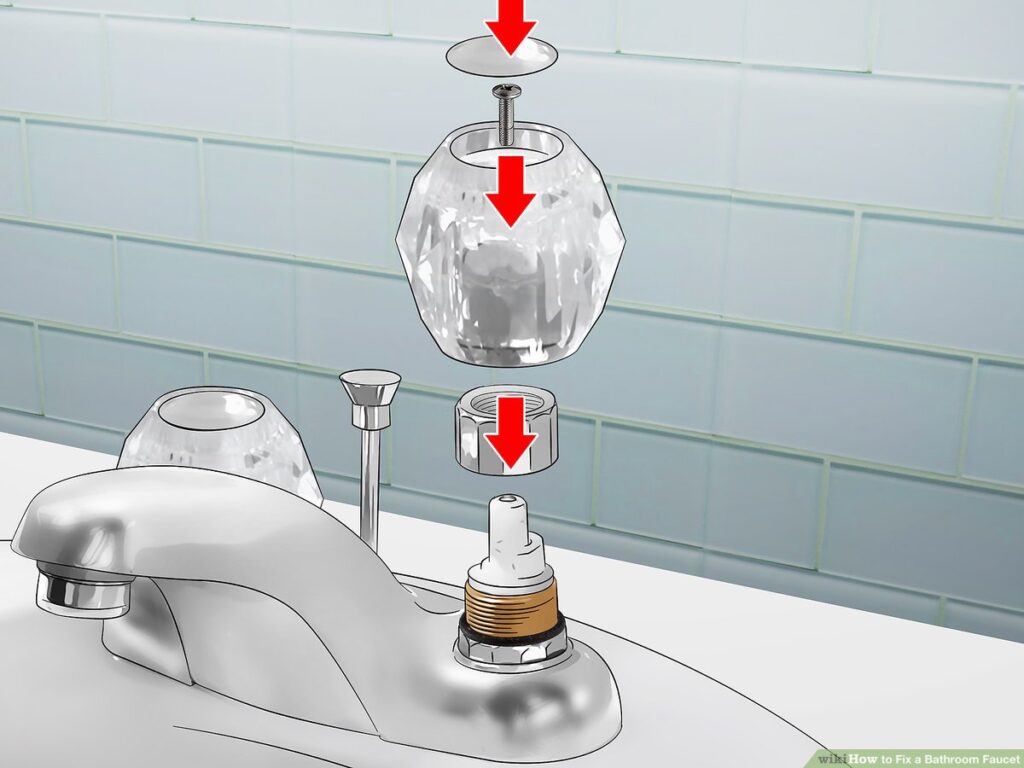
- Remove the Handle: Unscrew the handle and carefully remove it.
- Inspect the Adaptor: Examine the plastic or metal adaptor that connects the handle to the valve stem. Look for cracks, wear, or damage.
- Replace the Adaptor: If the adaptor is damaged, replace it with a new one. These are typically available at hardware stores or plumbing supply shops.
- Reinstall the Handle: Place the new adaptor on the valve stem and reinstall the handle, tightening the screw securely.
Scenario 3: Corrosion
- Apply Penetrating Oil: If the screw is corroded and difficult to remove, apply penetrating oil and let it sit for 15-20 minutes.
- Remove the Screw: Carefully remove the screw. If it breaks, you may need to use a screw extractor.
- Clean the Parts: Clean the screw, handle, and valve stem with white vinegar to remove mineral buildup.
- Reinstall the Handle: Reinstall the handle with a new screw if necessary.
Advanced Tap Handle Repair Techniques
Sometimes, a simple tightening isn’t enough. Here are some advanced techniques for more complex situations:
- Replacing the Valve Stem: If the valve stem is damaged, it will need to be replaced. This is a more involved repair that requires shutting off the main water supply and disassembling the tap.
- Using Threadlocker: For screws that consistently loosen, apply a small amount of threadlocker to the threads before tightening. This will help to keep the screw in place.
- Reaming the Handle: If the handle is too tight on the valve stem, you can use a reamer to slightly enlarge the opening.
These advanced techniques require a higher level of plumbing skill. If you’re not comfortable performing these repairs yourself, it’s best to call a qualified plumber.
Preventing Future Tap Handle Looseness
Prevention is always better than cure. Here are some tips to prevent your tap handle from becoming loose in the future:
- Regularly Check Screws: Periodically check the screws on your tap handles and tighten them as needed.
- Avoid Overtightening: Overtightening screws can damage the threads and lead to future problems.
- Use Quality Parts: When replacing parts, use high-quality components that are designed to last.
- Lubricate Moving Parts: Occasionally lubricate the moving parts of your tap with a silicone-based lubricant.
Choosing the Right Replacement Parts for Your Tap
Selecting the correct replacement parts is crucial for a successful and long-lasting repair. Here’s what to consider:
- Tap Type: Identify the type of tap you have (single-lever, two-handle, mixer, etc.) and purchase parts that are specifically designed for that type.
- Brand and Model: If possible, identify the brand and model of your tap. This will make it easier to find compatible parts.
- Material: Choose parts made from durable materials such as brass or stainless steel.
- Size and Dimensions: Ensure that the replacement parts are the correct size and dimensions for your tap.
Consult with a plumbing supply specialist if you’re unsure about which parts to choose. They can help you find the right components for your specific tap.
The Importance of Maintaining Your Taps for Longevity
Proper maintenance is key to extending the life of your taps and preventing common problems like loose handles. Regular cleaning, lubrication, and inspection can help to keep your taps in good working order for years to come.
- Clean Regularly: Clean your taps regularly with a mild soap and water solution to remove dirt, grime, and mineral buildup.
- Lubricate Moving Parts: Lubricate the moving parts of your taps with a silicone-based lubricant to keep them operating smoothly.
- Inspect Periodically: Periodically inspect your taps for leaks, corrosion, and loose parts.
By following these simple maintenance tips, you can keep your taps functioning properly and avoid costly repairs.
When to Call a Professional Plumber
While many tap handle repairs are straightforward DIY projects, there are times when it’s best to call a professional plumber. Consider seeking professional help if:
- You’re not comfortable performing the repair yourself.
- The problem is more complex than a loose screw or worn adaptor.
- You’re dealing with damaged pipes or a leaking valve.
- You’re unsure about which parts to use.
A qualified plumber has the knowledge, skills, and tools to diagnose and repair even the most challenging tap problems. They can also ensure that the repair is done correctly and safely.
Is it Time to Upgrade Your Taps?
Sometimes, instead of repairing an old tap, it makes more sense to upgrade to a new one. Here are some signs that it might be time for an upgrade:
- Your tap is old and outdated.
- Your tap is constantly leaking or malfunctioning.
- You want to improve the look and functionality of your kitchen or bathroom.
- You want to save water with a more efficient tap.
Upgrading to a new tap can improve the value and appeal of your home. It can also save you money on water bills and reduce the risk of future plumbing problems.
Expert Advice for a Tight, Long-Lasting Tap Handle
Dealing with a loose tap handle can be frustrating, but with the right knowledge and tools, it’s often a simple fix. By understanding the common causes, following our step-by-step repair guide, and implementing preventative measures, you can keep your taps in top condition. Remember, regular maintenance and prompt attention to minor issues can save you from more significant plumbing headaches down the road. If you’re ever unsure or uncomfortable, don’t hesitate to consult a qualified plumber. A little preventative care and informed action can ensure your taps remain secure and functional for years to come. Share your experiences with tap handle repairs in the comments below, and let’s learn from each other!
