Tighten Up: A Comprehensive Guide on How to Fix a Loose Handle on Your Kitchen Faucet
Is your kitchen faucet handle wobbly, spinning freely, or just plain loose? A loose faucet handle isn’t just annoying; it can lead to drips, wasted water, and eventually, more significant plumbing problems. Fortunately, fixing a loose handle on a kitchen faucet is often a straightforward DIY project that requires minimal tools and expertise. This comprehensive guide will walk you through the process, step-by-step, equipping you with the knowledge and confidence to tackle this common household repair. We’ll cover various faucet types, identify the underlying causes of loose handles, and provide detailed instructions on how to tighten them securely.
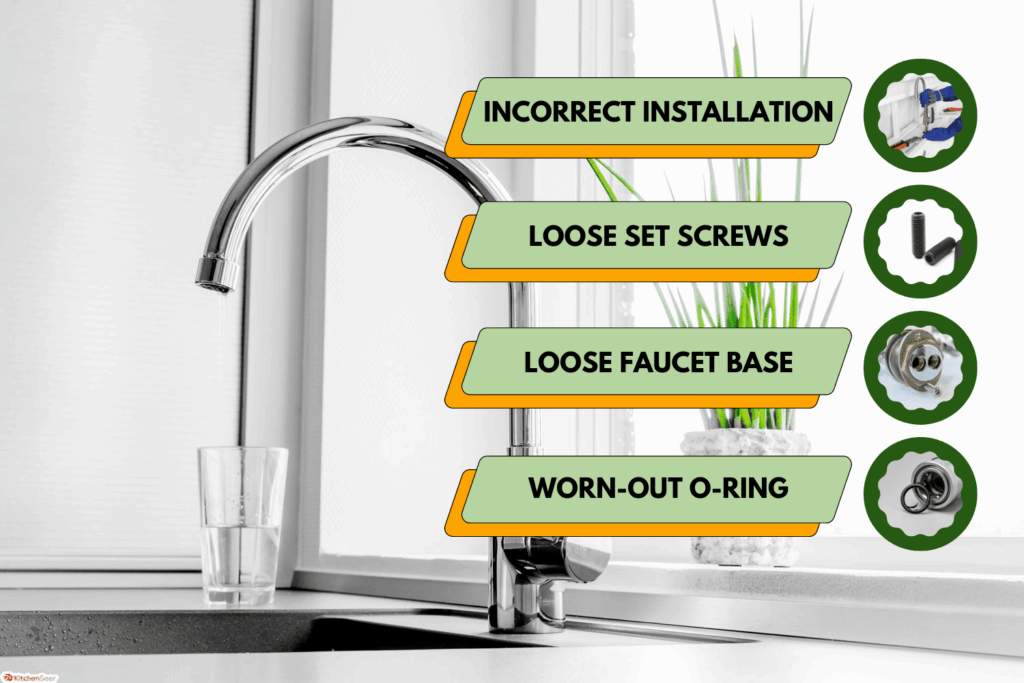
Understanding Why Your Kitchen Faucet Handle Is Loose
Before diving into the repair process, it’s essential to understand why your kitchen faucet handle might be loose in the first place. Several factors can contribute to this issue, including:
- Worn-out Screws: Over time, the screws that hold the handle in place can loosen due to vibrations and regular use.
- Corrosion: Mineral buildup and corrosion can affect the screw threads or the handle components, preventing a tight fit.
- Loose Set Screws: Some faucets use set screws, often hidden beneath decorative caps, to secure the handle to the valve stem. These screws can work their way loose over time.
- Damaged Cartridge or Valve Stem: In some cases, the underlying cartridge or valve stem itself might be damaged, causing the handle to feel loose even if the screws are tight.
- Normal Wear and Tear: Simply put, repeated use can cause parts to loosen or wear down over time, leading to a loose handle.
Identifying the cause can help you choose the right repair strategy and prevent the problem from recurring.
Essential Tools and Materials
Before you start, gather the necessary tools and materials. Having everything on hand will make the process smoother and more efficient. Here’s a list of common items you might need:
- Screwdrivers: A set of both Phillips head and flathead screwdrivers in various sizes.
- Allen Wrench Set: For faucets that use set screws, an Allen wrench set is crucial.
- Adjustable Wrench: Useful for tightening nuts and other fittings.
- Penetrating Oil: Helps loosen corroded or stuck screws.
- White Vinegar: For soaking and removing mineral deposits.
- Clean Cloths or Sponges: For wiping surfaces and cleaning parts.
- Plumber’s Tape: For resealing threaded connections if needed.
- Replacement Parts: If you suspect a damaged cartridge or valve stem, have replacement parts ready.
Step-by-Step Guide: How to Fix a Loose Faucet Handle
Now, let’s get to the actual repair. Follow these steps to tighten a loose handle on your kitchen faucet:
Step 1: Shut Off the Water Supply
Crucially important: Before you do anything else, turn off the water supply to the faucet. Locate the shut-off valves under the sink (one for hot water and one for cold water) and turn them clockwise until they are completely closed. If you don’t have individual shut-off valves, you’ll need to turn off the main water supply to your house.
Step 2: Identify the Faucet Type
Different faucet types have different handle attachment mechanisms. Common types include:
- Single-Handle Faucets: These typically have a single handle that controls both water temperature and flow. The handle is often secured with a set screw or a screw under a decorative cap.
- Two-Handle Faucets: These have separate handles for hot and cold water. The handles are usually attached with screws, sometimes concealed by decorative caps.
- Ball-Type Faucets: These faucets use a ball valve mechanism. The handle is connected to the ball valve stem, often with a set screw or a screw under a cap.
- Cartridge Faucets: These faucets use a cartridge to control water flow and temperature. The handle is attached to the cartridge stem, usually with a screw.
- Ceramic Disc Faucets: These faucets use ceramic discs to control water flow. The handle is attached to the disc valve stem, often with a screw.
Knowing your faucet type will help you locate the screws or set screws that need tightening.
Step 3: Locate and Access the Screw or Set Screw
Once you’ve identified your faucet type, look for the screw or set screw that secures the handle. Here’s where they are typically located:
- Under a Decorative Cap: Many faucets have a small decorative cap on the handle that conceals the screw. Use a small flathead screwdriver or a thin knife to gently pry off the cap.
- On the Side of the Handle: Some handles have a set screw located on the side, often near the base. Look for a small hole where the Allen wrench fits.
- At the Base of the Handle: In some cases, the screw is located at the base of the handle, where it connects to the faucet body.
Step 4: Tighten the Screw or Set Screw
Once you’ve located the screw or set screw, use the appropriate screwdriver or Allen wrench to tighten it. Turn the screw clockwise until it is snug, but be careful not to overtighten it, as this could strip the threads or damage the handle.
Step 5: Test the Handle
After tightening the screw, test the handle to see if it is secure. Turn it on and off, and check for any wobbling or looseness. If the handle is still loose, try tightening the screw a little more, but again, be careful not to overtighten it.
Step 6: Reassemble the Faucet
If you removed any decorative caps or other parts to access the screw, reassemble the faucet. Make sure all parts are properly aligned and securely in place.
Step 7: Turn the Water Supply Back On
Slowly turn the water supply back on by opening the shut-off valves under the sink. Check for leaks around the handle and the faucet base. If you see any leaks, tighten the connections as needed.
Troubleshooting Common Issues
Sometimes, simply tightening the screw isn’t enough to fix a loose faucet handle. Here are some common issues and how to address them:
- Stripped Screw Threads: If the screw threads are stripped, the screw won’t tighten properly. You may need to replace the screw with a new one of the same size and thread type. You might also consider using a slightly longer screw if there is room.
- Corroded Screws: If the screws are corroded, they may be difficult to remove or tighten. Apply penetrating oil to the screws and let it sit for a few minutes before attempting to loosen them. If they are too corroded, replace them.
- Damaged Cartridge or Valve Stem: If the underlying cartridge or valve stem is damaged, the handle may feel loose even if the screws are tight. In this case, you’ll need to replace the cartridge or valve stem. This typically involves disassembling the faucet and installing a new part.
- Loose Handle Base: Sometimes the entire handle base is loose, not just the handle itself. This could indicate a problem with the faucet mounting or the connections to the water supply lines. You may need to tighten the mounting nuts or replace the faucet entirely.
Preventive Maintenance Tips
To prevent loose faucet handles in the future, consider these preventive maintenance tips:
- Regularly Check Screws: Periodically check the screws on your faucet handles to ensure they are tight. This is especially important for faucets that get heavy use.
- Clean Mineral Deposits: Clean mineral deposits around the handle and faucet base regularly. Use white vinegar to dissolve mineral buildup and prevent corrosion.
- Lubricate Moving Parts: Lubricate moving parts, such as the valve stem or cartridge, with plumber’s grease to keep them working smoothly.
- Avoid Overtightening: When tightening screws, avoid overtightening them, as this can strip the threads or damage the handle.
When to Call a Plumber
While fixing a loose faucet handle is often a DIY-friendly task, there are times when it’s best to call a professional plumber. Consider contacting a plumber if:
- You’re uncomfortable working with plumbing.
- You can’t identify the cause of the problem.
- You’ve tried tightening the screws, but the handle is still loose.
- You suspect a more serious plumbing issue, such as a damaged cartridge or valve stem.
- You notice leaks around the faucet base or water supply lines.
Choosing the Right Replacement Parts
If you need to replace any parts, such as screws, cartridges, or valve stems, it’s essential to choose the right replacements. Here are some tips:
- Identify the Faucet Model: Knowing the make and model of your faucet will help you find the correct replacement parts. Look for a model number on the faucet body or in the owner’s manual.
- Match the Size and Thread Type: When replacing screws, make sure to match the size and thread type of the original screws.
- Purchase High-Quality Parts: Invest in high-quality replacement parts from a reputable supplier. This will ensure they last longer and perform better.
- Consider Universal Replacements: Some universal replacement parts are designed to fit a variety of faucets. However, always check the compatibility before purchasing.
Exploring Faucet Innovations: Touchless Technology
While addressing a loose handle, it’s interesting to consider the advancements in faucet technology. Touchless kitchen faucets are gaining popularity for their convenience and hygiene benefits. These faucets use sensors to detect when your hands are near, automatically turning the water on and off. This reduces the need to touch the handle, minimizing the spread of germs and potentially extending the life of the faucet mechanisms by reducing physical wear. While a touchless faucet won’t eliminate all potential plumbing issues, it’s a noteworthy innovation in kitchen technology.
The Importance of Proper Faucet Installation
A properly installed faucet is less likely to develop problems like loose handles. When installing a new faucet, ensure that all connections are tight and secure. Use plumber’s tape on threaded connections to prevent leaks. Follow the manufacturer’s instructions carefully, and don’t hesitate to call a plumber if you’re unsure about any part of the installation process. A little extra care during installation can save you from headaches down the road.
Beyond the Handle: Addressing Other Common Faucet Issues
While we’ve focused on loose handles, kitchen faucets can experience other problems. Low water pressure, leaks, and noisy operation are all common complaints. Diagnosing and addressing these issues promptly can prevent more significant plumbing problems. Regular cleaning and maintenance can also help extend the life of your faucet and keep it functioning smoothly. Consider a regular maintenance schedule to check for issues before they become major problems.
A Stable Faucet, A Smooth Kitchen
Fixing a loose handle on your kitchen faucet is a manageable task with the right knowledge and tools. By understanding the causes, following our step-by-step guide, and implementing preventive maintenance measures, you can keep your faucet working smoothly for years to come. A little effort can save you water, money, and the frustration of a wobbly handle. Don’t hesitate to share your own experiences or ask questions in the comments below. We’re all about helping each other keep our kitchens in top shape!
