Ruger Mark II Disassembly: A Comprehensive Guide to Safe and Effective Field Stripping
The Ruger Mark II is a classic .22 LR pistol renowned for its accuracy, reliability, and simple design. Whether you’re a seasoned shooter or a new gun owner, understanding how to properly disassemble your Ruger Mark II is crucial for routine cleaning, maintenance, and ensuring its continued performance. This comprehensive guide will walk you through each step of the Ruger Mark II disassembly process, emphasizing safety, precision, and the knowledge necessary to keep your firearm in top condition. We aim to provide a resource far exceeding simple instructions; this article reflects years of experience with the Ruger Mark II, offering insights into common pitfalls and best practices for a successful disassembly and reassembly.
Understanding the Ruger Mark II: A Foundation for Disassembly
Before diving into the steps, it’s essential to understand the Ruger Mark II’s basic components and how they interact. The pistol features a simple blowback action, a fixed barrel, and a detachable magazine. Its robust design contributes to its legendary reliability, but also means a specific disassembly procedure is required. Familiarity with the pistol’s nomenclature – receiver, bolt, trigger, mainspring housing, etc. – will greatly aid in following these instructions.
The Ruger Mark II’s enduring popularity stems from its accuracy and ease of maintenance. Knowing how to disassemble it properly is not just about cleaning; it’s about understanding the firearm’s inner workings and ensuring its longevity. This knowledge empowers you to diagnose potential issues, perform basic repairs, and maintain peak performance. As a testament to its design, the Ruger Mark II has remained a favorite among target shooters and plinkers for decades. Recent discussions in gunsmithing circles highlight the importance of proper disassembly techniques for preserving the firearm’s accuracy and reliability.
Essential Tools and Safety Precautions for Ruger Mark II Disassembly
Safety is paramount when handling any firearm. Before beginning the Ruger Mark II disassembly process, ensure the pistol is unloaded. Remove the magazine, visually inspect the chamber, and double-check to confirm it is empty. Always wear eye protection to prevent any accidental injury from small parts. Work in a well-lit and uncluttered workspace to avoid losing components.
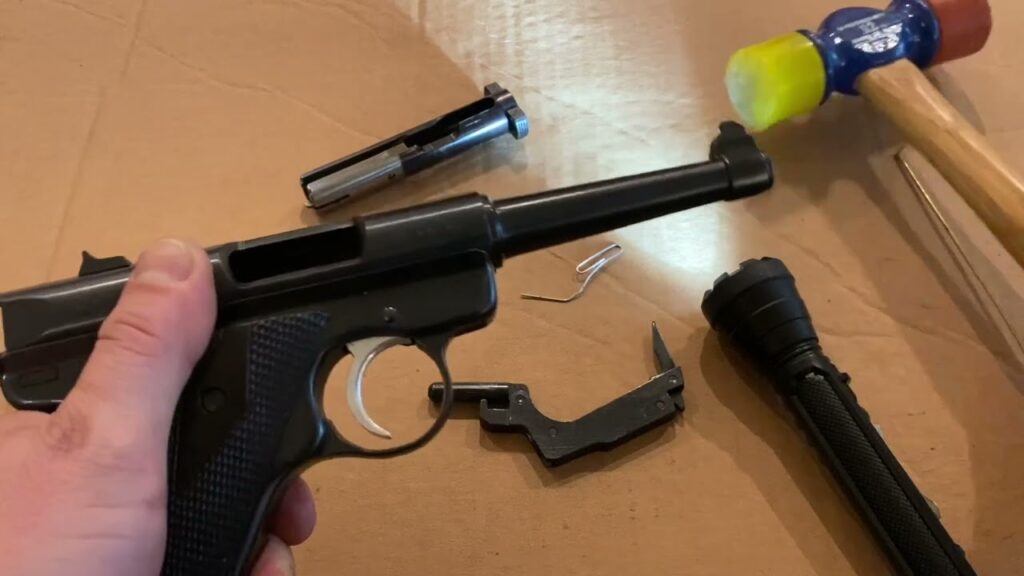
The following tools are recommended for a smooth and safe Ruger Mark II disassembly:
- A properly sized punch set (steel or nylon)
- A small hammer (preferably with a brass or nylon head)
- Screwdrivers (various sizes, including a small flathead)
- A cleaning mat or towel to protect the pistol and your work surface
- Gun oil or solvent for cleaning
While specialized gunsmithing tools can be helpful, the Ruger Mark II can be effectively disassembled with basic tools. The key is to use the right size tools to avoid damaging the firearm’s components. Never force any part during disassembly; if you encounter resistance, double-check the instructions and ensure you’re following the correct procedure.
Step-by-Step Ruger Mark II Disassembly Guide: A Detailed Walkthrough
Follow these steps carefully to safely and effectively disassemble your Ruger Mark II:
- Ensure the Firearm is Unloaded: As mentioned before, this is the most critical step. Remove the magazine and visually inspect the chamber to confirm it is empty.
- Lock the Bolt Back: Pull the bolt fully to the rear and engage the manual safety.
- Remove the Mainspring Housing Latch: Locate the latch at the rear of the grip frame. Using a punch or screwdriver, carefully push the latch pin inward to release the mainspring housing.
- Remove the Mainspring Housing: With the latch released, the mainspring housing should slide downwards and out of the frame. You may need to gently wiggle it to overcome any resistance.
- Remove the Bolt Stop Pin: After removing the mainspring housing, you’ll see the bolt stop pin. Push it out from either side of the receiver.
- Remove the Bolt: With the bolt stop pin removed, you can now remove the bolt. Pull the bolt back slightly and then lift it upwards and out of the receiver.
- Separate the Bolt Components: The bolt can be further disassembled for cleaning. This typically involves removing the firing pin and extractor. Consult the Ruger Mark II manual for specific instructions on this step, as it can vary slightly depending on the model.
- Remove the Trigger Assembly (Optional): The trigger assembly can be removed for more thorough cleaning or repair. This step is more complex and may require specialized tools. Only attempt this if you are comfortable with gunsmithing procedures.
Each step requires careful attention to detail. Avoid using excessive force, and always double-check the instructions if you encounter any difficulty. The Ruger Mark II’s design is relatively straightforward, but proper technique is essential to prevent damage.
Advanced Disassembly Considerations: The Bolt and Trigger Group
While the basic disassembly outlined above is sufficient for routine cleaning, more advanced disassembly may be required for specific repairs or thorough cleaning. Disassembling the bolt and trigger group requires a higher level of skill and familiarity with the Ruger Mark II’s internal mechanisms.
Bolt Disassembly: The bolt houses the firing pin, extractor, and other critical components. Disassembling the bolt allows for thorough cleaning of these parts and inspection for wear or damage. However, the small springs and pins involved can be easily lost, so it’s essential to work carefully and keep track of all components. According to experienced gunsmiths, proper reassembly of the bolt is crucial for ensuring reliable ignition and extraction.
Trigger Group Disassembly: The trigger group is a complex assembly of levers, springs, and pins that control the pistol’s firing mechanism. Disassembling the trigger group can be necessary to address trigger pull issues or to replace worn parts. However, this task is best left to experienced gunsmiths, as improper reassembly can render the pistol unsafe or inoperable.
Cleaning and Inspection: Key Steps After Ruger Mark II Disassembly
Once the Ruger Mark II is disassembled, thoroughly clean all components with a quality gun solvent. Pay particular attention to the barrel, bolt face, and firing pin channel. Use brushes, patches, and swabs to remove any fouling or debris. After cleaning, inspect all parts for wear, damage, or corrosion. Replace any worn or damaged parts to ensure proper function.
Lubricate all moving parts with a light coat of gun oil before reassembly. Avoid over-lubrication, as this can attract dirt and grime, leading to malfunctions. Focus on lubricating the bolt rails, trigger pivot points, and the mainspring housing. According to recent firearms maintenance guides, proper lubrication is critical for extending the life of your Ruger Mark II.
Ruger Mark II Reassembly: A Step-by-Step Guide
Reassembly is essentially the reverse of disassembly. Follow these steps carefully to ensure proper function:
- Reassemble the Bolt (If Disassembled): Ensure all bolt components are properly positioned and secured.
- Insert the Bolt into the Receiver: Slide the bolt into the receiver from the rear, ensuring it is properly aligned with the bolt rails.
- Insert the Bolt Stop Pin: Align the bolt stop pin with the holes in the receiver and bolt, and push it into place.
- Reinstall the Mainspring Housing: Align the mainspring housing with the frame and slide it upwards until it clicks into place. Ensure the latch is properly engaged.
- Function Check: After reassembly, perform a function check to ensure the pistol is operating correctly. Verify that the trigger resets properly, the safety engages and disengages smoothly, and the bolt cycles freely.
Proper reassembly is just as important as disassembly. Take your time, pay attention to detail, and double-check each step to ensure the pistol is functioning correctly. If you encounter any difficulties, consult the Ruger Mark II manual or seek assistance from a qualified gunsmith.
Troubleshooting Common Ruger Mark II Disassembly and Reassembly Issues
Even with careful attention to detail, you may encounter some common issues during Ruger Mark II disassembly and reassembly. Here are some troubleshooting tips:
- Difficulty Removing the Mainspring Housing: Ensure the latch is fully disengaged. If the housing is still stuck, gently tap it with a nylon punch.
- Difficulty Removing the Bolt: Make sure the bolt stop pin is fully removed. The bolt may also be slightly misaligned. Try wiggling it gently while pulling it rearward.
- Failure to Cycle After Reassembly: This could be due to improper bolt reassembly, insufficient lubrication, or a damaged recoil spring. Check each of these areas to identify the problem.
If you are unable to resolve the issue, consult a qualified gunsmith. Attempting to force parts or make unauthorized modifications can damage the pistol and create a safety hazard.
Maintaining Your Ruger Mark II: Best Practices for Long-Term Performance
Regular cleaning and maintenance are essential for ensuring the long-term performance of your Ruger Mark II. After each shooting session, disassemble and clean the pistol as described above. Inspect all parts for wear or damage, and replace them as needed. Store the pistol in a safe and dry location to prevent corrosion.
In addition to routine cleaning, consider having your Ruger Mark II professionally serviced by a qualified gunsmith every few years. A gunsmith can perform a more thorough inspection, identify potential issues, and make necessary repairs to keep your pistol in top condition. According to firearms experts, proactive maintenance is the key to preserving the value and performance of your Ruger Mark II.
The Enduring Legacy of the Ruger Mark II: A Testament to Quality and Design
The Ruger Mark II is more than just a .22 pistol; it’s a testament to quality craftsmanship and enduring design. Its simple yet robust construction, combined with its exceptional accuracy and reliability, has made it a favorite among shooters for decades. Understanding how to properly disassemble, clean, and maintain your Ruger Mark II is essential for preserving its value and ensuring its continued performance for years to come. By following the steps outlined in this guide, you can confidently care for your Ruger Mark II and enjoy its many benefits.
We encourage you to share your experiences with Ruger Mark II disassembly in the comments below. Your insights and questions can help other shooters learn and maintain their firearms effectively. For more advanced gunsmithing techniques and resources, explore our collection of expert guides and tutorials.
