How to Change Under the Sink Pipes to Stop Leaks: A Comprehensive Guide
Discovering a leak under your kitchen or bathroom sink is never a welcome surprise. The steady drip-drip-drip can quickly escalate into a costly plumbing problem if left unaddressed. Fortunately, in many cases, you can tackle the issue yourself by learning how to change under the sink the pipes cause of leak. This comprehensive guide will walk you through the process step-by-step, providing you with the knowledge and confidence to fix that leaky plumbing and prevent further water damage. We’ll cover everything from identifying the source of the leak to selecting the right replacement pipes and fittings, ensuring a successful and leak-free repair.
Understanding Under-Sink Plumbing and Leak Causes
Before diving into the repair process, it’s crucial to understand the basic components of your under-sink plumbing and the common reasons why leaks occur. Familiarizing yourself with these elements will not only help you pinpoint the problem but also make the replacement process smoother.
Common Plumbing Components
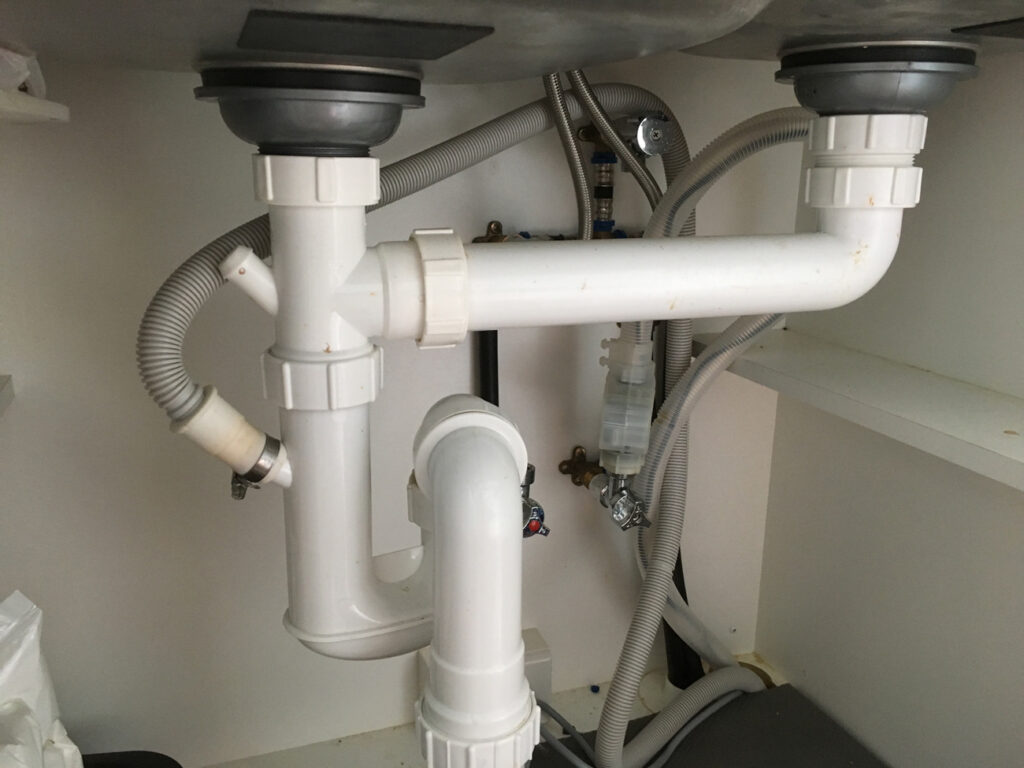
The plumbing under your sink typically consists of the following:
- Supply Lines: These flexible tubes connect the shut-off valves to the faucet. They carry hot and cold water.
- Shut-Off Valves: These valves control the water flow to the faucet. They’re essential for turning off the water supply before making any repairs.
- Drain Pipes: This network of pipes carries wastewater from the sink drain to the main drainpipe in the wall.
- P-Trap: This curved section of pipe is designed to trap debris and prevent sewer gases from entering your home. It’s a common site for leaks.
- Tailpiece: This pipe connects the sink drain to the P-trap.
- Slip Nuts and Washers: These components are used to connect the various pipes and fittings. They create a watertight seal.
Why Pipes Leak Under the Sink
Several factors can contribute to leaks under your sink:
- Corrosion: Over time, metal pipes can corrode, leading to pinhole leaks.
- Loose Connections: Vibrations and temperature changes can loosen slip nuts, causing leaks at the joints.
- Damaged Washers: Worn or cracked washers can fail to create a watertight seal.
- Clogged Drains: Blockages in the drainpipe can increase pressure, leading to leaks.
- Physical Damage: Accidental bumps or impacts can crack or break pipes.
Tools and Materials You’ll Need
Before you start, gather the necessary tools and materials. Having everything on hand will save you time and frustration.
Essential Tools
- Basin Wrench: This specialized wrench is designed to reach tight spaces under the sink.
- Adjustable Wrench: Useful for tightening and loosening slip nuts and other fittings.
- Channel-Lock Pliers: Provide extra grip for stubborn connections.
- Screwdrivers (Phillips and Flathead): For removing and installing screws.
- Utility Knife: For cutting pipe or removing old sealant.
- Bucket: To catch any water that spills during the repair.
- Rags or Towels: For cleaning up spills and drying surfaces.
- Flashlight or Headlamp: To illuminate the work area.
- Safety Glasses: To protect your eyes from debris.
Necessary Materials
- Replacement Pipes: Purchase new pipes that match the size and type of the existing ones. PVC is a common and affordable option.
- Replacement Fittings: Buy new slip nuts, washers, and any other fittings that are damaged or worn.
- Plumber’s Putty: Used to seal the sink drain to the sink basin.
- Teflon Tape: Used to seal threaded connections.
- PVC Primer and Cement (if using PVC pipes): To bond PVC pipes and fittings together.
Step-by-Step Guide: How to Change Under the Sink the Pipes Cause of Leak
Now that you have your tools and materials, let’s get started with the repair process. Follow these steps carefully to ensure a successful outcome.
Step 1: Turn Off the Water Supply
The first and most important step is to turn off the water supply to the sink. Locate the shut-off valves under the sink (usually two valves, one for hot water and one for cold water) and turn them clockwise until they are completely closed. If you don’t have shut-off valves, you’ll need to turn off the main water supply to your house.
Step 2: Disconnect the Old Pipes
Place a bucket under the pipes to catch any remaining water. Use a basin wrench or adjustable wrench to loosen the slip nuts connecting the pipes. Work slowly and carefully to avoid damaging the surrounding plumbing. Once the slip nuts are loose, you should be able to disconnect the pipes by hand. Pay attention to the order in which the pipes are connected, as you’ll need to replicate this when installing the new pipes.
Step 3: Inspect the Old Pipes and Fittings
Once you’ve removed the old pipes, inspect them carefully to identify the source of the leak. Look for cracks, corrosion, or damaged fittings. This will help you determine which parts need to be replaced. Also, examine the sink drain and the tailpiece for any signs of damage.
Step 4: Measure and Cut the New Pipes (If Necessary)
If you’re using PVC pipes, you may need to cut them to the correct length. Use a utility knife or a PVC pipe cutter to make clean, straight cuts. Measure the old pipes carefully to ensure that the new pipes are the same length. Remember, it’s always better to cut the pipe a little longer than needed, as you can always trim it down later.
Step 5: Assemble the New Pipes and Fittings
Now it’s time to assemble the new pipes and fittings. If you’re using PVC pipes, apply PVC primer to the inside of the fittings and the outside of the pipes. Then, apply PVC cement to the same areas and quickly push the fittings onto the pipes. Hold the pieces together for a few seconds to allow the cement to set. If you’re using metal pipes, simply tighten the slip nuts to connect the pipes and fittings.
Step 6: Install the P-Trap
The P-trap is a crucial component of the drain system, as it prevents sewer gases from entering your home. Make sure the P-trap is properly aligned and that all connections are tight. Use new washers and slip nuts to ensure a watertight seal.
Step 7: Connect the Tailpiece to the Sink Drain
Apply a bead of plumber’s putty around the sink drain opening. Then, insert the tailpiece into the drain and tighten the nut underneath the sink. Remove any excess plumber’s putty with a utility knife.
Step 8: Connect the Supply Lines
If you disconnected the supply lines, reconnect them to the faucet and the shut-off valves. Use Teflon tape to seal the threaded connections and tighten the nuts with an adjustable wrench. Be careful not to overtighten the nuts, as this can damage the supply lines.
Step 9: Turn on the Water Supply and Check for Leaks
Slowly turn on the water supply to the sink. Check all the connections for leaks. If you see any leaks, tighten the slip nuts or fittings until the leaks stop. If a connection continues to leak, you may need to disassemble it and replace the washers or fittings.
Troubleshooting Common Problems
Even with careful installation, you may encounter some problems. Here are some common issues and how to resolve them:
- Leaks at Slip Nut Connections: Tighten the slip nut further. If the leak persists, replace the washer.
- Leaks at Threaded Connections: Apply more Teflon tape to the threads and retighten the connection.
- Slow Draining: Check for clogs in the drainpipe. Use a drain snake to remove any blockages.
- Persistent Leaks: If you can’t stop the leak, it may be necessary to call a professional plumber.
When to Call a Professional Plumber
While many under-sink plumbing repairs can be done yourself, there are times when it’s best to call a professional plumber. Consider calling a plumber if:
- You’re uncomfortable working with plumbing.
- You’re unable to identify the source of the leak.
- The leak is severe or involves multiple pipes.
- You’re dealing with corroded or damaged pipes that are difficult to remove.
- You suspect there may be a larger plumbing problem.
Preventing Future Leaks
Once you’ve fixed the leak, take steps to prevent future problems:
- Regularly Inspect Your Plumbing: Check under your sink for leaks on a regular basis.
- Tighten Loose Connections: Periodically tighten slip nuts and other fittings.
- Avoid Overloading the Sink: Don’t pour grease or other debris down the drain.
- Use a Drain Strainer: A drain strainer will catch hair and other debris, preventing clogs.
- Consider Replacing Old Pipes: If your pipes are old and corroded, consider replacing them with new ones.
Choosing the Right Pipes and Fittings
Selecting the correct pipes and fittings is critical for a successful and long-lasting repair. Here’s a breakdown of common materials and their applications:
- PVC (Polyvinyl Chloride): PVC is a popular choice for drainpipes due to its affordability, durability, and ease of installation. It’s resistant to corrosion and can be easily cut and joined with PVC primer and cement.
- CPVC (Chlorinated Polyvinyl Chloride): CPVC is similar to PVC but can withstand higher temperatures, making it suitable for hot water lines.
- PEX (Cross-Linked Polyethylene): PEX is a flexible plastic tubing that’s commonly used for supply lines. It’s easy to install and resistant to freezing.
- Copper: Copper pipes are durable and long-lasting, but they’re more expensive and require soldering to join.
- Chrome-Plated Brass: Chrome-plated brass pipes are often used for exposed plumbing under the sink. They’re aesthetically pleasing and resistant to corrosion.
When choosing fittings, make sure they are compatible with the type of pipe you’re using. Use slip nuts and washers that are specifically designed for the pipe material.
Expert Tips for a Leak-Free Repair
To ensure a successful and leak-free repair, consider these expert tips:
- Take Your Time: Don’t rush the repair process. Work slowly and carefully to avoid mistakes.
- Use New Washers: Always use new washers when connecting pipes and fittings. Old washers can be worn or cracked, leading to leaks.
- Apply Teflon Tape Properly: Wrap Teflon tape around threaded connections in a clockwise direction. This will help create a watertight seal.
- Tighten Connections Snugly: Tighten slip nuts and fittings until they are snug, but don’t overtighten them. Overtightening can damage the pipes or fittings.
- Based on expert consensus, double-check all connections for leaks after turning the water back on.
A Fresh Start with Dry Cabinets
Knowing how to change under the sink the pipes cause of leak empowers you to tackle a common household plumbing issue efficiently and effectively. By following these detailed steps, understanding the tools and materials involved, and implementing preventative measures, you can keep your under-sink area dry and avoid costly water damage. Remember, safety is paramount, so always turn off the water supply before beginning any plumbing repairs. If you encounter any difficulties or are unsure about any aspect of the process, don’t hesitate to consult a qualified plumber.
